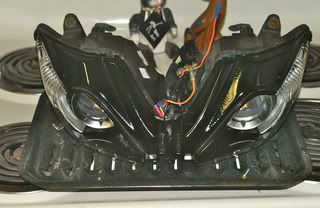
As promised here is the how-to for painting the interior of your headlamps
After repeating this process for this write-up I have come to realize that some headlamps may be better sealed than others and so I must add the following:
WARNING!!! Do this how-to at your own risk! I do not give any guarantee that you will be successful at performing this procedure, nor am I responsible for:
1. Headlamp breakage
2. Misshapen (ugly) headlamp bucket due to necessary prying for separation
3. Water leakage due to improper sealing
4. Burned hands (or searing of skin to metal bobbin's)
5. Cuts to fingers, hands, arms, stomach or any other body part
6. Vulgarities near or around sensitive ears:rant:
To remove the nose from the bike use the following:
http://www.triumph675.net/forum/showthread.php?t=8995
The headlamp is attached to the nose by four (4) MM bolts
Tools needed:
1. Razor blade, preferably a razor knife
2. Small flathead screwdriver
3. #2 Phillips-head screwdriver
4. Small dikes or snips
5. 10mm socket
6. 6mm socket
7. Waterproof sealant (silicone caulk, etc...)
8. Household oven
OPTIONAL:
Gloves for sensitive hands acifier:
Heat gun
Pliers
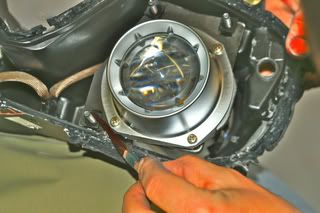
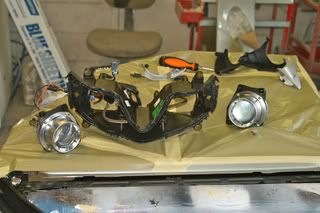
After removing the headlamp assymbly from the nose all covers and bulbs MUST be removed. Covers are removed with a phillips-head screwdriver, marker bulbs simply pull out, the low-beam is held on by retainer, the high-beam twists off.
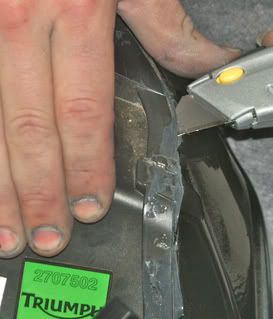
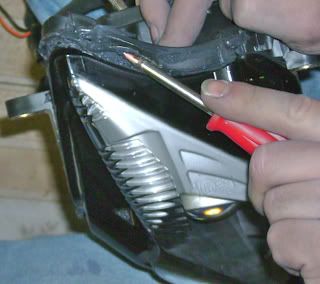
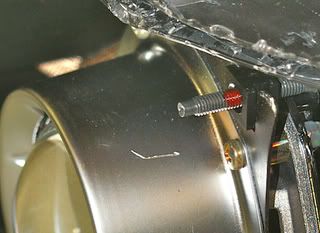
Once holding the empty housing the best way to start is by removing the excess sealant (rubbery surface) from the seam of the housing, this can be done by rubbing or scraping with finger or razor.
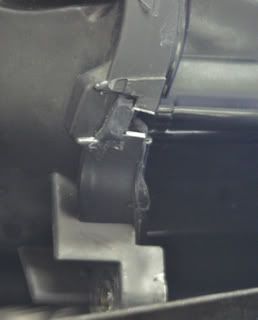
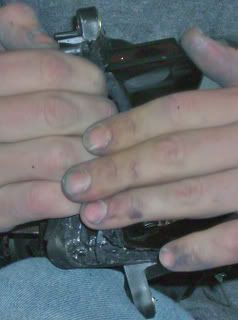
After excess is removed you have to make a decision (A) pry the little 'clips' around the headlamp or (B) snip them off with dikes. I chose option B
![Image]()
![Image]()
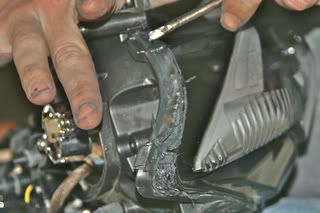
After getting the clips out of the way take a razor knife and cut along the seam between the housing and the lens until you feel you have adequately weakened the seal between the two pieces.
![Image]()
![Image]()
Pre-heat you oven to 275*F (135*C), place oven rack at highest setting that allows your headlamp to fit. Place housing on larger flat surface (baking sheet, aluminum boiling pan, large flat rock, whatever)
![Image]()
![Image]()
Once pre-heated place housing into oven for approximately 7 minutes (higher altitudes may need to add a minute). During this time get something to take a very hot surface out of the oven, put on gloves (if you want), get tools ready. DO NOT open your oven prematurely. As with any other premature action you will be disappointed.:noclue: Opening the oven will loose about 50*F (10*C), this is not good.
After the needed time has expired remove headlamp from oven (leave oven on just in case) and begin the following steps as quickly as possible.
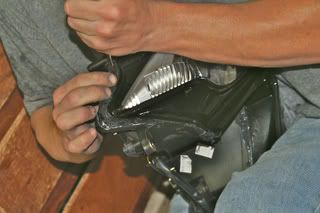
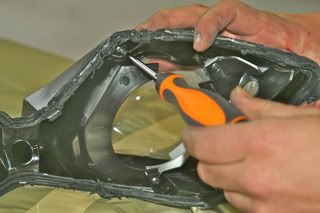
Start by inserting a small flathead screwdriver into the seam at the corner of the housing and begin working the screwdriver along the seem, gently prying the two pieces apart. Once there is an adequate opening you can try to pull the to halves apart with you hands (this will take a good amount of force and even more caution)
![Image]()
![Image]()
![Image]()
![Image]()
![Image]()
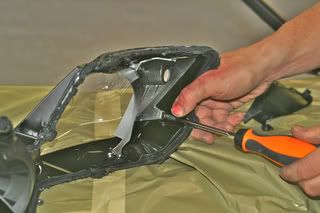
Additional cutting of sealant may be required to allow separation. If at any point the housing cools do not hesitate to re-insert into the oven for 2-3min to maintain workability.
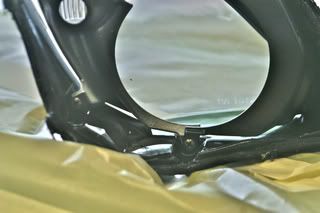
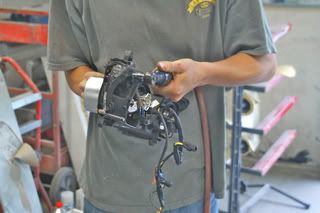
Hopefully you will now have two (2) halves
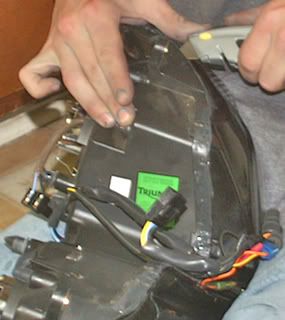
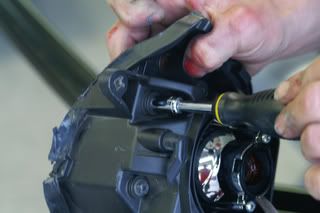
To remove the plastics from inside the lens housing remove the six (6) phillips-head screws from each side.
![Image]()
![Image]()
Pay close attention to how the two pieces attach at this screw.
![Image]()
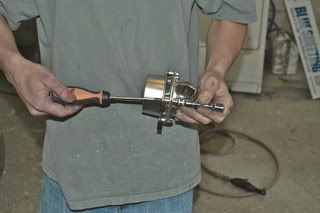
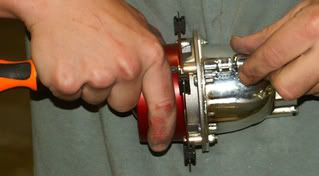
To remove the surround from the projector lens you need to first remove the projectors themselves. Start by marking the adjustment screws so that you can easily align projectors upon reassembly. Then remove the projectors by backing the three (3) aligning screws out with a 10mm socket.
![Image]()
![Image]()
![Image]()
![Image]()
WOO HOO more pieces!:girlfaint:
![Image]()
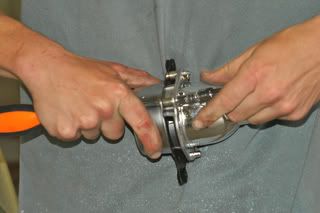
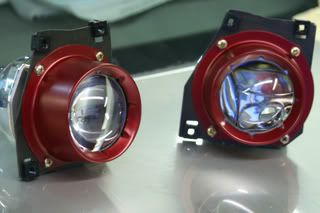
The projector surround is held to the assembly by four (4) phillipshead screws and 6mm bolts
![Image]()
![Image]()
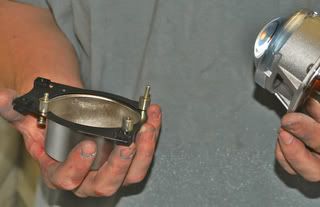
Make sure not to loose the metal spacers as you remove the mounting plate.
![Image]()
![Image]()
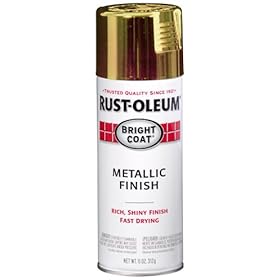
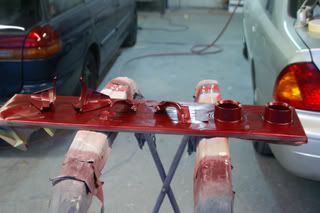
Now for the fun part...painting! Prep the plastics and metal surround the standard way and apply multiple light coats of paint.
![Image]()
To assemble just reverse the above processes
![Image]()
![Image]()
![Image]()
![Image]()
![Image]()
![Image]()
Once the lens and bucket housings have been reassembled, align the lens portion into the groove of the bucket portion and press together.
If you managed to warp the groove on the bucket portion you will need to remake the groove. The best way to do this is by heating the bucket groove with a heat gun and reforming with a pair of pliers (keep in mind you need to hold the shape till the plastic cools to retain shape)
![Image]()
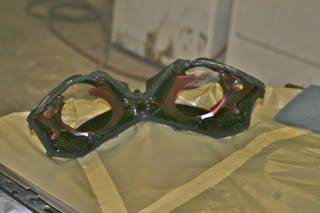
Place housing back into oven for 3-5minutes, remove, press (squeeze) AND hold this 275*F (135*C) housing together for 2-3min or until cool. Take your waterproof sealer and run a bead along the housing seam to recreate the waterproof barrier.
![Image]()
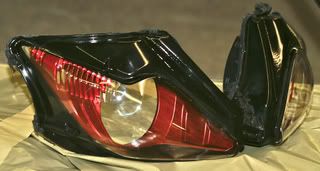
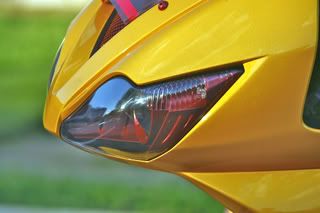
Congratulations! Hopefully you should now be enjoying a very unique mod. Install headlamp to nose; nose to bike; enjoy! :bouncy:
![Image]()
![Image]()
![Image]()
![Image]()
Special thanks to Father Azmodious for allowing me to use his headlamp for this write-up and for all the photos used within! :notworthy:
After repeating this process for this write-up I have come to realize that some headlamps may be better sealed than others and so I must add the following:
WARNING!!! Do this how-to at your own risk! I do not give any guarantee that you will be successful at performing this procedure, nor am I responsible for:
1. Headlamp breakage
2. Misshapen (ugly) headlamp bucket due to necessary prying for separation
3. Water leakage due to improper sealing
4. Burned hands (or searing of skin to metal bobbin's)
5. Cuts to fingers, hands, arms, stomach or any other body part
6. Vulgarities near or around sensitive ears:rant:
To remove the nose from the bike use the following:
http://www.triumph675.net/forum/showthread.php?t=8995
The headlamp is attached to the nose by four (4) MM bolts
Tools needed:
1. Razor blade, preferably a razor knife
2. Small flathead screwdriver
3. #2 Phillips-head screwdriver
4. Small dikes or snips
5. 10mm socket
6. 6mm socket
7. Waterproof sealant (silicone caulk, etc...)
8. Household oven
OPTIONAL:
Gloves for sensitive hands
acifier:Heat gun
Pliers
After removing the headlamp assymbly from the nose all covers and bulbs MUST be removed. Covers are removed with a phillips-head screwdriver, marker bulbs simply pull out, the low-beam is held on by retainer, the high-beam twists off.
Once holding the empty housing the best way to start is by removing the excess sealant (rubbery surface) from the seam of the housing, this can be done by rubbing or scraping with finger or razor.
After excess is removed you have to make a decision (A) pry the little 'clips' around the headlamp or (B) snip them off with dikes. I chose option B

After getting the clips out of the way take a razor knife and cut along the seam between the housing and the lens until you feel you have adequately weakened the seal between the two pieces.
Pre-heat you oven to 275*F (135*C), place oven rack at highest setting that allows your headlamp to fit. Place housing on larger flat surface (baking sheet, aluminum boiling pan, large flat rock, whatever)

Once pre-heated place housing into oven for approximately 7 minutes (higher altitudes may need to add a minute). During this time get something to take a very hot surface out of the oven, put on gloves (if you want), get tools ready. DO NOT open your oven prematurely. As with any other premature action you will be disappointed.:noclue: Opening the oven will loose about 50*F (10*C), this is not good.
After the needed time has expired remove headlamp from oven (leave oven on just in case) and begin the following steps as quickly as possible.
Start by inserting a small flathead screwdriver into the seam at the corner of the housing and begin working the screwdriver along the seem, gently prying the two pieces apart. Once there is an adequate opening you can try to pull the to halves apart with you hands (this will take a good amount of force and even more caution)

Additional cutting of sealant may be required to allow separation. If at any point the housing cools do not hesitate to re-insert into the oven for 2-3min to maintain workability.
Hopefully you will now have two (2) halves
To remove the plastics from inside the lens housing remove the six (6) phillips-head screws from each side.
Pay close attention to how the two pieces attach at this screw.
To remove the surround from the projector lens you need to first remove the projectors themselves. Start by marking the adjustment screws so that you can easily align projectors upon reassembly. Then remove the projectors by backing the three (3) aligning screws out with a 10mm socket.
WOO HOO more pieces!:girlfaint:
The projector surround is held to the assembly by four (4) phillipshead screws and 6mm bolts
Make sure not to loose the metal spacers as you remove the mounting plate.

Now for the fun part...painting! Prep the plastics and metal surround the standard way and apply multiple light coats of paint.
To assemble just reverse the above processes

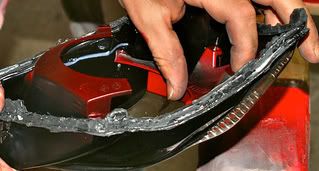
Once the lens and bucket housings have been reassembled, align the lens portion into the groove of the bucket portion and press together.
If you managed to warp the groove on the bucket portion you will need to remake the groove. The best way to do this is by heating the bucket groove with a heat gun and reforming with a pair of pliers (keep in mind you need to hold the shape till the plastic cools to retain shape)

Place housing back into oven for 3-5minutes, remove, press (squeeze) AND hold this 275*F (135*C) housing together for 2-3min or until cool. Take your waterproof sealer and run a bead along the housing seam to recreate the waterproof barrier.
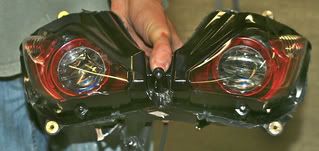
Congratulations! Hopefully you should now be enjoying a very unique mod. Install headlamp to nose; nose to bike; enjoy! :bouncy:


Special thanks to Father Azmodious for allowing me to use his headlamp for this write-up and for all the photos used within! :notworthy: