Triumph 675 Forums banner

Daytona to StreetFighter Conversion - Project Trixie Transformation

1 reading
186K views 331 replies 77 participants last post by  Ruby Racing  
#1 ·
Having been inspired by the likes of 1 riktig svensk I am about to undergo my very own Daytona to Street Triple conversion. I plan to keep you informed about my progress, with plenty of pictures.

So first off, why am I doing this? Why am I going to rip apart a beautiful looking bike? Why don’t I just buy a Street Triple? Well, I love the Daytona, the engine the handling, etc. I just can’t get on with a sports bike on the road. I find them too uncomfortable. I have a GSX-R1000 that I race anyway, so I don’t need another sports bike.

Why not buy a Street Triple I hear you cry? Well, no offence to those who own one, but I don’t like the looks. The twin cans and twin headlights don’t do it for me. I love the Daytona’s rear end though.

As we often read in the bike mags, when a manufacturer turns a sports bike into a road bike (like R1 to Fazer), they detune the engines, fit cheaper suspension, brakes, etc and basically take away all the good bits.

So that is pretty much it. Plus I wanted a project bike. So that’s what I have, a 2006 Daytona. Not even a crashed one. I did consider that, but where I live it’s hard to get hold of crash damaged bikes as they are all shipped off to the UK.

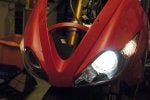
Here is a pic of the starting point. Why Trixie Transformation? I name all my bikes, but my wife beat me to it and named her Trixie.
 

Attachments

#42 ·
Probably.

BUT:

I would still have had to sort out the rear end and I would have a less powerful motor.

A Street Triple R is more expensive than a 2006 675.

PLUS:

I wanted a project.

I wanted a challenge.
 
#46 ·
Day 4

Day 4

All the wires to the relays and fuse box are cut now and I have those components fitted in their new home on the top of the air box. Quick check to see that the fuel tank will fit over them. Yup, that's OK. I was pretty confident the fuel tank would be the same between models.

Next I altered the loom so that the wires are all in the same place coming out of the main loom to go to the relays and fuse box.

There is a lambda sensor in the exhaust which is under the engine near the EXUP valve. The wires for this go from near the ECU, to the front of the bike, underneath the headlamps, then run down near the clutch cable to the exhaust. On the Street Triple the wire runs from near the ECU, down the right side of the engine to the exhaust and is about the quarter the length of the routing on the Daytona. Why don't they run it like the Street Triple? It's more direct and uses a quarter of the wire. I haven't shortened the wire yet as I want to get the relays and fuse box connected again, then fire her up to see if she still runs before I make other changes.

I also redirect the wires for the flip switch. I was hoping to leave it in a similar position to where it already lives: just in front of the speedo. But my replacement bikini fairing doesn't have enough room, so it's going to live on the right side of the air box in the same place as the Street Triple.

The barometric sensor can live in my new bikini fairing, also in front of the speedo, so I shouldn't need to alter the wiring for that.

Next I pull the whole loom back through the frame and then push it out of the left side of the headstock, just like the Street Triple. I will need to add wires for the handlebar switches and maybe shorten others. I don't know by how much yet as I can't move forward until I get my handlebar risers and new throttle and clutch cables, so I can get the correct length. I also need to mount the bikini fairing, or at least a temporary lash up, to make sure the handlebars clear it.

The pictures show my cut loom with plenty of idiot proof labels (hopefully!) and the fuse box and relays in their new home on top of the air box.

Well that's enough for today, not that I can do any more until I get the handle bars on. I did get another eBay bargain turn up today. I got a loom from a crashed Daytona for £20. It's a bit damaged at some ends, but I only got it so that I could use exactly the correct coloured and thickness wiring when re-connecting my components.
 

Attachments

#47 · (Edited)
Day 5

Day 5

Picked up my handlebar risers this week so I have been able to fit the handlebars. They are Renthals Universal Street. Just sitting on the bike in the garage they feel a little low, but I'll reserve judgement until I ride her. I also fitted the Street Triple clutch cable and moved the switchgear and clutch lever onto the Renthals.

Now I have the handlebars on I can see that the wires from the handlebar switches and the ignition key will reach to their new home behind the headstock, on the left inside of the frame. I may have to shorten one or two of them, which is better than having to lengthen them!

I reckon I have three options to connect these to the loom:

I can cut the wires to length and re-solder the block connectors where I need them.
I can try and source the correct size spade connectors that fit in the blocks and re-use the original block connectors.
I can purchase some new block connectors and connect them where needed.

Re-soldering about 24 wires is going to be a pain in the ass so I will avoid that option if at all possible. Although it does have the benefit of not really costing me anything.

Trying to source the correct spade connectors to fit in the blocks I think will be near on impossible, so I'll forget that option.

Buying some new block connectors is probably the best and tidiest solution, so I shall search for some suitable connectors.

Did a bit more wire soldering, I'm slowly getting better. I found out I didn't have the right size soldering iron so I managed to borrow one from a mate. That has made the job much easier. Right tool for the job an' all that.

Sorry if this seems to moving a little slowly, but sorting out the wires is a much bigger job than I thought and I'm finding it hard to put aside the time to work on her. It's not really feasible to do half an hour here or there as it takes some brain power and I need to have time to complete a batch of re-wiring.
 
#49 ·
I used the stock wiring harness, just modded it a bit. I didn't have the Street airox cover, so I put all the fuses, and relays between the frame, and airbox on the right side. Then I ran the front end wiring through the intake ducting in the frame. Through the headstock. Then a longer front brake cable, and a Street Triple clutch wire. I bought an OEM Street Triple headlight/gauge mount. But used a set of aftermarket headlights, with a custom mount. http://www.aztec8.com

I used these headlights....
http://www.aztec8.com/catalog/i40.html

With a set of their LED front blinkers. http://www.aztec8.com/catalog/i7.html

Then I drilled out the sidemount hole on the headlights, and mounted the LED's there.

If you look at my project thread, it shows it on page 1.

Stage 1 of the Daytona - Striple conversion is complete....planning stage 2.... - Triumph675.Net Forums
 
#51 ·
#52 ·
Day 6

Day 6

Just did a bit more soldering of wires today, including the ones connecting to the lambda sensor in the exhaust. Had some problems with the thicker ones from the fuse box though. Ran out of the thicker heat shrink tubing so have had to leave a couple of the thicker wires for now.

I had a bit of a nightmare though. I had two wires the same colour coming out of a relay and I hadn't labelled them for some reason. Luckily I was able to determine which wire should go where, but I won't know for sure if I got it right until first fire up. I'm still expecting her not to start. I'm the eternal pessimist.
 
#53 ·
Day 7

Day 7

I needed to add some wires today. That meant pulling apart the cheap damaged loom I got off eBay. You'd think pulling sticky tape apart would take no time. WRONG! It took me ages, in fact most of the time I had available. Still, it's done now so I can get the wires I need as soon as I need them now. Connected up the wires to one of the relays. My soldering technique is definitely improving now. I put a blob of solder on the soldering iron, then put this under the wire to be soldered and at the same time I add some solder to the soldering iron which seems to make it easier to get the solder to melt into the wires from the top. Whatever, it's getting easier, so another skill is being learnt.
 
#54 · (Edited)
Day 8

Day 8

Shortened the wires for the flip switch which sits on the right side of the airbox and then soldered them into the loom wires. Next I was looking at the wires from the handlebar switches and the ignition to decide which ones needed to be shortened. Basically I think that I need to shorten the right and left handle bar switch cables and the ignition cable. I will source some suitable block connectors. The cable to the speedo doesn't need to be altered, or the one to the air pressure sensor that sits in front of the speedo. Also the light cable can stay the same, but I will be fitting a different connector as the new light setup is different and I need a couple more wires in it.

Starting to feel more confident about what I'm doing and how I can solve problems. Although I still expect silence when I try to start her again for the first time. When I do get her running again the next worry will be that she doesn't go up in flames due to a wiring cock up.

Sorry no pictures at the moment, but I'm just doing the wiring and that's pretty boring to photograph.
 
#55 ·
Just Joined the site and saw your thread. Luv it dude. I've been doing the same thing with the same bike. Some things I've done different, some the same, some better, some worse. I'll have to post some pics when I get a chance. I made a bitchen sub frame from scratch. Your right the wireing is a biotch, but the best part of your thread is the street triple guys trying to say you don't need any more motor then they have! HAHA! Fkn Tina's! Thats what the guys with less motor always say as you pass'em with cornerspeed or under breaking. Good luck with your project.
 
#59 ·
Day 9

Day 9

I have a Street Triple belly pan to go on which I bought second hand. Unfortunately it came without the mounting brackets so I had to order those. I tried to fit it today and even though the mounting brackets are genuine Triumph I couldn't get the front brackets to fit on the bike. I wondered if there were more brackets I needed. Luckily I managed to get a close up look at another forum members Street Triple R (Thanks Bean Machine. He only lives two minutes down the road). Saw the problem straight away. The Street Triple has some extra castings on the lower sump where the front brackets locate. I thought that this would be one of the easier jobs! So I reckon I have three options:

1. Weld some mountings onto the existing sump.

2. Buy a second hand Street Triple sump, assuming they are the same as a 675.

3. Make some brackets for the Triumph brackets to attach to and mount these using the two nearby sump bolts.

I'm just doing a welding course at the moment, but I think I'll pass on option 1. I think either option 2 or 3. Have to check out the sump part numbers.

Pictures below show the differences between the sumps of the Daytona and the Street Triple. Thanks Sleepy_Triple_R for the photos of your Street Triple.

More wiring today! Soldered a big wire to the fuse box. Not a great job. Fit new block connectors to the right handlebar switchgear and the joining side on the loom.
 

Attachments

#60 ·
Day 10

Day 10

Yet more wiring! Fitted new block connectors to the ignition switch wiring and the joining side on the loom, then the left handlebar switchgear and the joining side on the loom. Before cutting wires I make notes of what wires go where and take photographs just in case. When looking at the left handlebar switchgear block connector I found that two wires do not connect to anything on the opposite block connector! Having no electrical knowledge I didn't understand this. Surely a wire coming out of the switchgear needs to attach to something else?

Time to consult the wiring diagram in the manual. In the manual it shows that the red/yellow wire does not connect to anything! It's for the dipped beam switch on the headlight. As my bike has the dipped beam on permanently, could it be that some markets in the world can turn their lights off and in these countries that wire would connect to another wire in the loom?

Then there is also a blue wire which I think comes from the indicators. This doesn't even appear in the wiring diagram in my manual! It also doesn't connect to anything on the loom side connector.

Can anyone explain please?
 
#61 ·
Street triple oil sump

Hey, I've been watching your progress and felt I needed to chime in. I just happened to have the fairings off my 08 Daytona and noticed that my oil sump has the bolt bosses that yours is missing. I believe your engine is pre street triple. I would guess that all 675's after the street was introduced have the same sump. Should make finding one a bit easier. Keep the updates coming!
 
#62 ·
Hey, I've been watching your progress and felt I needed to chime in. I just happened to have the fairings off my 08 Daytona and noticed that my oil sump has the bolt bosses that yours is missing. I believe your engine is pre street triple. I would guess that all 675's after the street was introduced have the same sump. Should make finding one a bit easier. Keep the updates coming!
Thanks for that. Yes mine is one of the first 2006 models.
 
#63 ·
Day 11

Day 11

More work on the ignition switch block connectors. Move the wires for the flapper valve and horn. Will put a resistor onto the flapper valve later. 47 OHM I believe?

Moved the indicator relay to its new home on top of the airbox with all the others and reconnected the wires to the loom.

When I has having a look at Bean Machines Street Triple R I noticed that the cables for the lights and speedo exited the frame above the radiator and not the side of the headstock like the handlebar and ignition switches. I had missed this before when looking at a showroom model, but luckily Bean Machine had his forks off so I could see more clearly. This was great help as the exit at the side of the headstock is getting a little busy, so this makes life easier.

So I rerouted those wires. After that I got busy reconnecting a lot of wires that had to wait for other wires to be reconnected to determine how long the wires had to be where best to solder them together. Er, hope that makes sense.

Got a lot done today and I think I'm pretty close to being able to try and start her again, to see if I got it right. Scary time ahead.
 
#66 ·
Day 12

Day 12

Today is the day. Today I am in a position to turn the ignition key and see if what I have done is correct, or if I have completely screwed things up. The battery is going to be replaced as it doesn't hold it's charge for very long, so I take the precaution of charging the battery first.

While that's going on I do some temporary reconnection of wires (lights, indicators, flapper valve) just in case they have an impact on things. I re-check everything I have done to make sure no wires are unconnected. The charger has finished its work. I put the fuel tank back on and then connect up the clocks.

Key in the ignition.

I turn the key.........

NOTHING! NOTHING £@&%ING HAPPENS! AAAAAAAARRRRRRRRRGGGGGGGGGHHH!

This is bad, this is very bad. When I say nothing happens, I mean no rev lights come on, the LCD display doesn't appear, the rev counter needle doesn't do its trendy sweep of the clocks. Nothing. I push the starter button. Still nothing.

My heart sinks.

I'm out of my depth now.

I walk away.

Sorry no photos. Unless you want one of me going nuclear.
 
#67 ·
Check your ignition relay voltages.

At least if nothing happens you aren't damaging anything. Rewiring a bike completely is a big job, I do this shit for a living and I don't take it lightly. Drink a beer, calm down and bust out a meter.
 
#69 · (Edited)
Day 13

Day 13

Hmmm. Day 13. My lucky numbers (my race number is 31) so perhaps I can sort it today. I had a good think about it overnight and looked at the wiring diagram, although I might as well have been reading Greek for all the good it does. Nothing was happening, so a fundamental lack of power? I charged the battery and the Optimate said all was good with the battery. I check it with a volt meter and sure enough it's producing the goods.

I check the fuse box (er no Noiseboy, I didn't take any fuses out. Should I have done when soldering?), I look at each fuse and do continuity tests on all wires going in and out and everything is fine there.

So I have power and everything I've looked at so far seems to be OK. Maybe the power from the battery is not getting "out"? I look at the big wires leaving the battery and follow them to their first connection with anything. It's not far away, about 6 inches. Hmmm. What's this then? I look at the wiring diagram again, not really expecting it to speak to me. Battery goes to "43". I look up what "43" is. It's the starter solenoid. Then a light bulb moment. It says it's fused. I know fuses blow, so could that be it? I look closely at the starter solenoid and see a 30 amp fuse on the side of it. Hang on, that's just a spare. Where does the fuse go? Aha! This plastic cover comes off and lo, another 30 amp fuse.

It takes some pulling out. I look at it closely and it looks blown to me. My despair goes from DESCON 1 to DESCON 2. Could this be the cause of my woes? If it is, how the heck did it blow? I haven't started the bike since I commenced work on the loom. Hang on, there is a big brown wire that connects with it. I had trouble soldering that and spent some time with the soldering iron on the wire. Could it have got too hot and blown? If so, why didn't the fuse in the fuse box blow as that end of the wire was much closer and the fuse smaller? Whatever!

I put the new fuse in. A small prayer to the God of motorcycling. I turn the key..............

Watch the movie to find out

 
#76 · (Edited)
She's never sounded sweeter!

Excellent news! What have you got left to do?
So here is my job list:

1. Fit different headlights/bikini fairing. Requires a custom made bracket.

2. Re-direct the wiring loom. DONE

3. Fit Street Triple yokes and handlebars. DONE

4. Fit Street Triple throttle & clutch cables. DONE CLUTCH

5. Lengthen wiring from handlebars. NOT NEEDED

6. Relocate the relays and fuse box that live inside left fairing panel. DONE

7. Remove all bits associated with flapper valve. DONE

8. Relocate indicator relay from behind radiator. DONE

9. Relocate flip switch from in front of speedo. DONE

10. Get rid of horrible brown engine covers and cam cover.

11. Repaint bike and wheels.

12. Fit mirrors.

13. Loads of other stuff I hadn't anticipated!!!!

13a. Make brackets to fit bellypan.

13b. Make bracket to mount speedo on bikini fairing.

13c. Fit new indicators.

13d. Tape up loom once road tested.

13e. Fit resistor to flapper valve wiring.

13f. Fit longer brake line on front brake.

13g. More stuff I hadn't anticipated!

Well done mate.
It must have been a long night of worrying
Oh, it certainly was. But having a good think about it and some advice from others helped massively.
 
#75 ·
Well done mate.
It must have been a long night of worrying
 
#77 ·
Day 14

Day 14

Not much time to do anything today, so I just add a little bit of wiring. Jut for a change!

Going back to my post for Day 10 I said:

"When looking at the left handlebar switchgear block connector I found that two wires do not connect to anything on the opposite block connector! Having no electrical knowledge I didn't understand this. Surely a wire coming out of the switchgear needs to attach to something else?

Time to consult the wiring diagram in the manual. In the manual it shows that the red/yellow wire does not connect to anything! It's for the dipped beam switch on the headlight. As my bike has the dipped beam on permanently, could it be that some markets in the world can turn their lights off and in these countries that wire would connect to another wire in the loom?"

I have had a great help here from TeriyakiMonkey who pointed out that switchgear is made by a third party for use on many different bikes and the manufacturer uses those wires that it needs. As the Daytona has its dip beam on permanently it has no use for this yellow/red wire. However it is of huge benefit to my conversion and I have to thank TeriyakiMonkey for pointing this out to me.

My new lighting arrangement has a different set up and if I leave the wiring as it is I risk blowing fuses or melting wires. That's where the yellow/red wire comes in that currently does nothing. If I cut the blue/red wire going to the dip beam (on the standard Daytona the blue/red wire is located running from the blue relay to the connector to the lights) and run this back to connect with the yellow/red wire in the switchgear then when I switch from dip to main, the dip light turns off, rather than staying on at the same time as the main beam light.

Look at the photos to see the result. Also I have included the wiring change supplied to me by TeriyakiMonkey. Thanks again for that mate.
 

Attachments